Recommendations to Improve Quality Assurance of Quenched and Tempered Pipeline Fittings – White Paper
August 2018
National Energy Board of Canada
Table of Contents
- Executive Summary
- 1. Introduction
- 2. Quenched and Tempered Fittings
- 3. Identification of Gaps
- 4. Addressing the Gaps
- 5. Conclusions
- Acronyms
- Glossary
- References
- Appendix A
- Appendix B
Executive Summary
Heat treated pipeline fittings require careful process control. Deviations from specified manufacturing process parameters can affect the mechanical properties of the fittings. In addition, the current testing practices to validate process compliance are not always able to identify the non-conforming fittings (e.g., coupon test instead of testing a sacrificial fitting).
In recent years, the National Energy Board (NEB) became aware of instances where heat treated pipe and fittings with yield strength properties that were lower than specified had been installed on pipeline systems under NEB and other regulatory bodies’ jurisdiction.
It is important to note that to date, there have been no reported incidents on in-service pipelines regulated by the NEB, where the root-cause has been attributed to non-conforming quenched and tempered (Q&T) fittings. None the less, the NEB has taken several proactive actions in order to address this issue including: investigating heat treated fittings with indications of low yield, issuing several regulatory instruments, launching a project on Quality Assurance (QA) of pipeline fittings, commissioning a third party technical paper, and hosting a technical workshop. These actions were instrumental in identifying gaps in the current standards, regulations and Quality Assurance Programs (QAPs) of stakeholders.
Effective quality assurance for Q&T pipeline fittings relies on applying consistent controls throughout the production process; implementing systematic procurement and change management practices; and ongoing effort to implement the highest performance standards possible.
The purpose of this white paper is to outline areas for improvement and to put forward recommendations for the NEB and stakeholders across the supply chain such as implementing full traceability for Q&T fittings, conducting technical audits at manufacturers’ facilities on a regular basis and procuring from approved manufacturers list. Table 1 below provides a full list of these recommendations. Section 4.3 of this white paper further expands on them.
The NEB encourages the applicable recipients to take proactive and timely actions on following up with the recommendations of this white paper. The NEB intends to follow up with recipients in the event the recipients do not fully implement the recommendations highlighted in the white paper.
| Recipient | Recommended Actions | Desired End Results |
|---|---|---|
| NEB-regulated Company | 1. Require full traceability of Q&T fittings from manufacturers and distributors |
Enhancing pipeline companies’ QAPs |
2.a Require procurement from the Approved Manufacturers List (AML) including when buying from distributors |
||
3. Conduct the following at manufacturers’ facilities on a regular basis:
|
||
Canadian Energy Pipeline Association (CEPA) |
4. Address the identified Inspection and Test Plan (ITP) related gaps for Q&T fittings in the ITP standard |
Raising the level of minimum standards |
5. Include the following for Q&T fittings in the scope of the project on developing a broad lessons-learned database for all quality and safety issues:
|
Collaboration and knowledge sharing among NEB-regulated companies |
|
| Manufacturing Companies | 6. Follow up on workshop suggestions as outlined in Appendix B |
Enhancing manufacturing companies’ QAPs |
| Distributing Companies | 7. Follow up on workshop suggestions as outlined in Appendix B |
Enhancing distributing companies’ QAPs |
| NEB | 8. Consider whether and where, within the NEB’s regulatory framework (including relevant CSA standards), to add further precision as specified in section 4.3 |
Adding clarity to regulatory requirements |
9. Lead the development of a guideline for key aspects and objectives of manufacturers’ and purchasers’ QAPs |
Adding clarity to regulatory requirements |
|
10. Further engage with regulators outside of Canada and the U.S. |
Collaboration and knowledge sharing with other global regulators |
|
11. Conduct Compliance Verification Activities (CVAs) for QA of Q&T fittings |
Assessing pipeline companies’ QAPs |
|
12. Liaise with industry and research and development (R&D) organizations to explore initiation of R&D projects as specified in section 4.3 |
|
|
| Standards Body | 13. Specify the limit ranges for chemistry and carbon equivalent in CSA Z245.11 |
Raising the level of minimum standards |
14. Enhance minimum requirements for MTRs |
Raising the level of minimum standards |
|
15. Include requirements for First Article Inspection (FAI) in CSA Z245.11 |
Raising the level of minimum standards |
|
16. Review CSA Z245.11 and make applicable optional requirements for fittings mandatory (e.g., traceability) |
Raising the level of minimum standards |
1. Introduction
Pipeline fittings (principally elbows, tees, and reducers) made from steel and heat treated by quenching and tempering require careful process control. For example, furnace temperature, placement of the fittings in the furnace, transfer time to the quenching tank and adequacy of quench or tempering time can all impact the fittings’ mechanical properties if not done properly.
In recent years, the NEB became aware of instances of quenched and tempered (Q&T) pipe and fittings having mechanical properties that did not meet Canadian Standards Association (CSA) or similar standards, being installed on pipeline systems under NEB and other regulatory bodies’ jurisdiction.
The issue of Q&T fittings not meeting specification entering the supply chain in Canada appears to be part of a bigger issue going back to 2007 and 2008 when there was a significant increase in new pipeline construction in the United States (U.S.). To meet the construction demand for high yield strength line pipe, pipe from both established and non-established suppliers entered the market. Subsequently there were reports of a number of pipe joints expanding beyond dimensional tolerance limits during field hydrostatic testing (INGAA, 2009). The Pipeline and Hazardous Materials Safety Administration (PHMSA) in the U.S. issued an advisory in May 2009 (PHMSA, 2009) to warn pipeline owners and operators of this issue. In October 2009, the Interstate Natural Gas Association of America (INGAA) initiated a Pipe Quality Action Plan with eight elements that were identified through the advisory bulletin and industry experiences. Eight separate working groups were formed to work on each element. As a result of this work, among other things, several white papers were produced that are available on INGAA’s website.
Following a fitting failure on a pipeline project in the U.S. in 2010, the NEB asked the regulated company to demonstrate that fittings on the Canadian portion of the project were fit for service. The company provided extensive analysis that concluded that the fittings were fit for service. In 2013 a pipeline rupture occurred on an NEB-regulated pipeline. The Transportation Safety Board of Canada (TSB) issued its report on the incident in 2015. Although failure to meet mechanical specifications was not the cause of the incident, investigations revealed that there were fittings installed on the pipeline that did not meet the Specified Minimum Yield Strength (SMYS) (TSB, 2013). The NEB then undertook further investigations to determine if this low yield issue might indicate a systemic problem. In some cases, contrary to the recorded information in the Material Test Reports (MTRs), not all fittings met the specified material requirements, and this was due to inadequate controls in the quality assurance programs (QAPs) throughout the manufacture and supply chain.
The NEB has taken several actions in order to address this issue, including:
- in 2016 and 2017, issuing industry wide Safety Advisories (SA 2016-01 and SA 2016-01A2) advising companies of the issue;
- in 2016, issuing an Order (MO-001-2016) to all companies under its jurisdiction, instructing pipeline and processing plant companies to report to the NEB on pipe or components having mechanical properties not meeting specifications within 60 days;
- in 2017, launching a project on QA of Pipeline Fittings;
- in 2017, commissioning a third party to investigate and write the QA of Pipeline Fittings technical paper on this issue (Technical Paper);
- in 2017, hosting a technical workshop to facilitate broad dialogue between various stakeholders aimed at understanding the issue and discussing possible solutions; and
- in 2018, issuing an Order (MO-003-2018) to all companies under its jurisdiction with ongoing requirements for pipeline and processing plant companies to report to the NEB on pipe or components having mechanical properties not meeting specifications.
The recommendations in this paper are applicable to Q&T fittings.
2. Quenched and Tempered Fittings
In order to obtain the desired final properties with a balance of strength and toughness, high strength fittings undergo a heat treatment processFootnote 1. This process includes:
- 1. Austenitizing – Heating the component to austenitization temperature range for a specified amount of time (e.g., 920 °C and held at this temperature for a minimum of 1 hour per 25 mm of maximum thickness, but not less than 0.5 hour, throughout the total thickness (CSA, 2017)), (Figure 1).
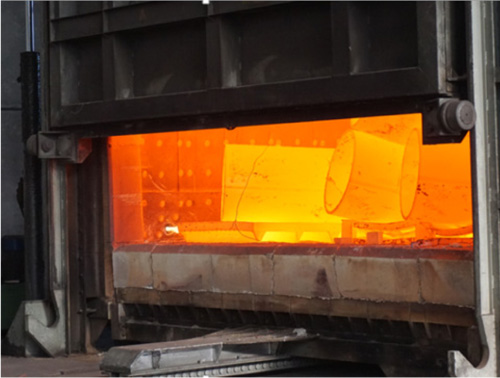
Figure 1 – Heating the component to its austenitization temperature range for a specified amount of time
- 2. Quenching – Transferring the component to a quenching tank (within 60 seconds) and rapidly cooling it (Figure 2 and Figure 3). Each quenching tank has a characteristic heat transfer capability that is plant-specific. It depends on temperature and flow rate of the quenching medium (usually water) and size of the quenching tank (CanmetMATERIALS, 2017).
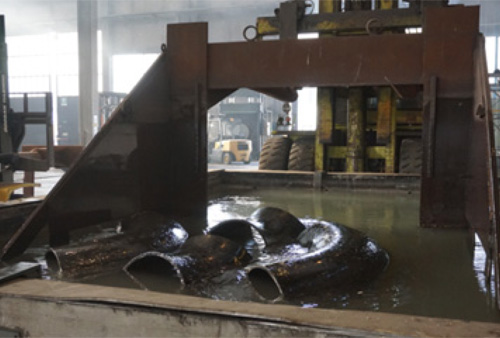
Figure 2 – Water quenching the component
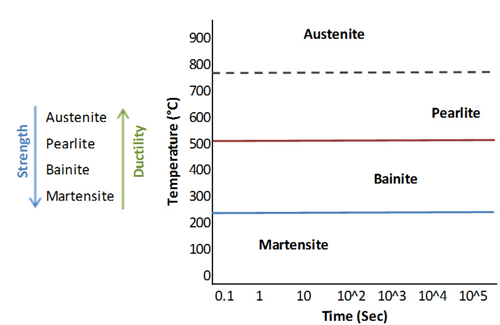
Figure 3 – Temperature–Time range for formation of different steel microstructures
when cooled (quenched) from austenitization temperature (simplified)
Figure Description
This image shows a simplified time-temperature-transformation diagram for formation of different steel microstructures when cooled from austenitization temperature. Martensite forms by rapid cooling to a temperature below 240 °C. Martensite is hard and brittle. Bainite forms at cooling rates slower than required for martensite formation and at a higher temperature between approximately 250 °C and 500 °C. Pearlite is formed by slow cooling and at temperatures below 727 °C. It is less hard and more ductile than Martensite.
- 3. Tempering – Gradually reheating the component to a temperature below the transformation range, but not less than 540 °C, and holding for specified amount of time (e.g., 700 °C and held at this temperature for a minimum of 1 hour per 25 mm of maximum thickness, but not less than 0.5 hour, throughout the total thickness (CSA, 2017) (Figure 4).
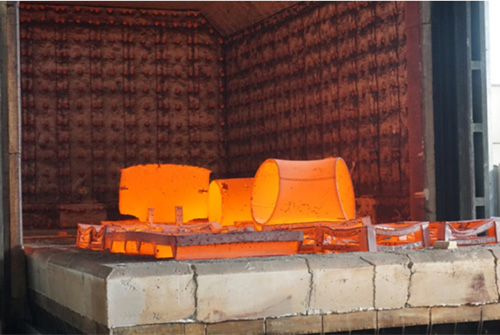
Figure 4 – Tempering the component in furnace
- 4. Air cooling – The component is then allowed to cool gradually in still air (Figure 5).
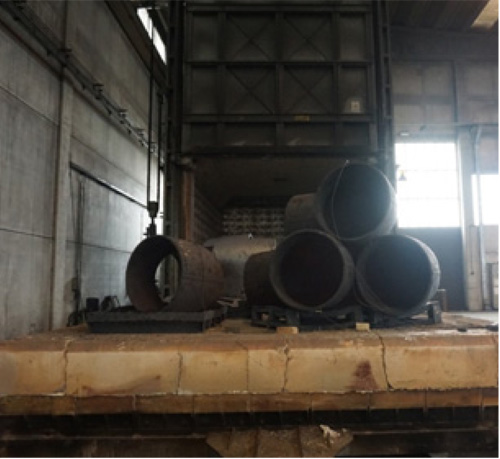
Figure 5 – Component is allowed to cool in still air
At the end of Step 2 steel has high strength and hardness properties but low toughness (e.g., has more brittle characteristics). This is addressed by tempering in Step 3 that results in steel with a balance of both high strength and toughness (e.g., has improved ductility characteristics).
Out-of-specification mechanical properties are mainly due to inadequate steel compositions, improper manufacturing methods and improper heat treatment parameters (CanmetMATERIALS, 2017). Deviations from specific heat treatment process parameters such as furnace loading, temperature, hold times, and quench media temperature or agitation can also affect a fitting’s microstructure and final properties. A study by CanmetMATERIALS found that the final microstructure of the fitting is highly sensitive to changes in cooling rate. Table 2 shows an example of variation in final steel properties for two different cooling rates.
| Cooling rate (°C/s) |
Microstructure | Hardness (Hv 500g) |
|---|---|---|
| 20 | 75% bainite + 25% martensite | 268 |
| 80 | 12% bainite + 88% martensite | 412 |
3. Identification of Gaps
3.1 Failures
The NEB examined four cases in Canada of manufactured fittings not meeting specifications, or fittings failing during pressure testing. In these cases, the failure causes were attributed to factors such as:
- manufacturing facility maintenance issues;
- manufacturer’s inadequate control over manufacturing processes;
- use of improper raw materials; and
- insufficient training and competency of manufacturing operators.
Table 3 includes examples of the above findings.
| Failure Cause | Examples |
|---|---|
| Manufacturing facility maintenance issues |
|
| Inadequate control over manufacturing processes |
|
| Improper raw materials |
|
| Insufficient training and competency of manufacturing operators |
|
In one instance of localized low yield noted by the NEB, worn racks had deformed to the point that the contact area was significantly expanded and may not have conformed to the requirements of the original manufacturing procedure qualification tests (DNV – GL, 2017).
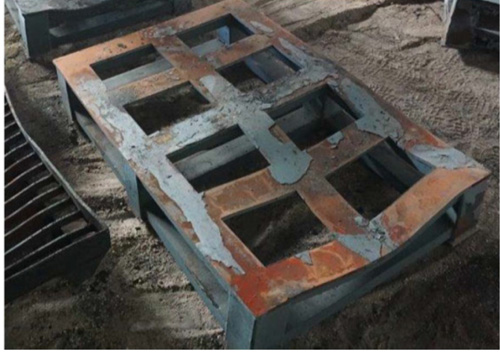
Figure 6 – Steel pallet used to support welded elbows in the furnace
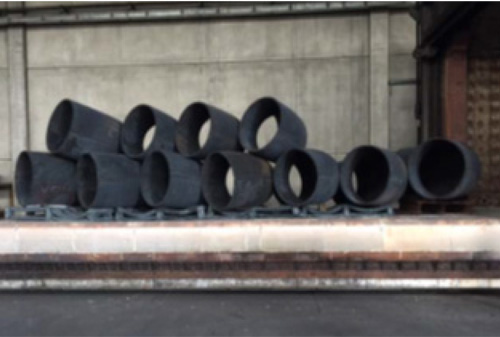
Figure 7 – Welded elbows placed in stacking arrangement
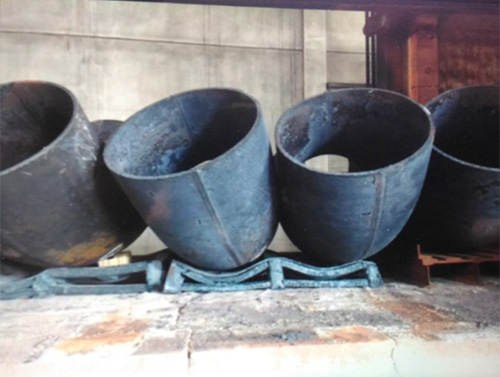
Figure 8 – Improper furnace loading simulation, areas of low yield strength on the elbows
have been linked to where the fittings touch each other and the pallets on which they sit
3.2 Findings
In 2016, following issuance of Order MO-001-2016 (MO), to all regulated companies, the NEB received responses as well as a number of Engineering Assessments (EAs) from companies. The NEB’s investigations into nonconforming fittings and review of MO responses and EAs highlighted other issues including:
- traceability;
- inaccuracy of some MTRs;
- issues with Approved Manufacturers List (AML);
- insufficient Inspection and Test Plan (ITP); and
- gaps in the applicable standards; and
- lack of explicit requirements in regulations.
Table 4 provides examples of additional findings from the fore-going.
| Additional Findings | Examples |
|---|---|
| Traceability |
|
| Inaccuracy of some MTRs |
|
| Issues with AML |
|
| Insufficient ITP |
|
| Gaps in standards |
|
| Lack of explicit requirements in regulations |
|
3.3 Standards
As mentioned earlier, the NEB commissioned the Technical Paper in order to identify current gaps in the existing standards. The following standards were reviewed:
- CSA Z662-15, Oil and gas pipeline systems;
- CSA Z245.1-14, Steel Pipe;
- CSA Z245.11-13, Steel Fittings; and
- MSS SP-75 (2014), High Strength, Wrought, Butt-Welding Fittings.
The Technical Paper highlighted that in the investigated cases, fittings’ non-conformance to existing standards and specifications, was a direct result of failure to control the manufacturing processes. The primary reasons for these fittings entering the supply chain relates to specific issues such as absence of raw material (plate) traceability, improper material receipt inspection – in part due to insufficient training and competency of inspectors, and lack of comprehensive acceptance testing (DNV – GL, 2017). Table 5 provides a summary of the gaps that were identified in the Technical Paper.
| Criteria | Standard | Gap | Addressed in CSA Z245.11-17? (Y/N) |
|---|---|---|---|
| Chemistry aim points and limits | CSA Z245.11-13 MSS SP-75 (2014) |
Limit ranges not defined | N |
| IngotFootnote 3 or strand (continuous)Footnote 4 casting requirements, slab identification, and traceability | CSA Z245.11-13 MSS SP-75 (2014) |
Not addressed | N |
| PlateFootnote 5 or skelpFootnote 6 requirements, testing requirements, identification, and traceability | CSA Z245.11-13 MSS SP-75 (2014) |
Not addressed | Optional (Clause 6.6) |
| Plate or skelp shipping and handling requirements | CSA Z245.11-13 MSS SP-75 (2014) |
Not addressed | N |
| Traceability | CSA Z245.11-13 | Not addressed | Optional (Clause 6.6) |
| MPS | CSA Z245.11-13 | Not addressed | Optional (Clause 6.6) |
| ITP | CSA Z245.11-13 | Product specific inspection and testing plan not required | Optional (Clause 6.7) |
| MTR | CSA Z245.11-13 MSS SP-75 (2014) |
Various gaps in material and lot testing | Partially (Clause 15) |
| Heat Treating | CSA Z245.11-13 MSS SP-75 (2014) |
Lack of specified process controls | Partially (various clauses) |
| Product Ordering Requirements | CSA Z245.11-13 MSS SP-75 (2014) |
Reliance on buyer specifications | Partially (Clause 4.1) |
3.4 Summary
In summary, the gaps identified through fittings failure investigations, MO responses, and the Technical Paper fall into three main categories:
- Standards;
- OPR; and
- QAPs.
Table 6 provides a summary of the identified gaps in each category.
| Standards | OPR | QAPs | |
|---|---|---|---|
| NEB-regulated Company | Manufacturer | ||
| As specified in Table 5 | Lack of explicit requirements for traceability | Lack of traceability | |
| Insufficient ITP | |||
| AML issues | Improper raw material | ||
| Insufficient training and competency of inspectors |
Improper facility maintenance | ||
| Inadequate control over manufacturing processes | |||
| Inaccurate MTRs | |||
| Insufficient training and competency of personnel | |||
4. Addressing the Gaps
4.1 Steps Taken
Safety Advisories and MOs – In 2016 and 2017, the NEB issued two safety advisories to inform regulated companies of four instances where the manufactured fittings had not met the specified mechanical properties. In them, the NEB identified four manufacturers. In 2016, the NEB also issued an MO to direct companies to report within 60 days whether they had purchased fittings from any of these manufacturers. The companies were also required to report on fittings that did not meet mechanical specifications and were purchased from other manufacturers that were not identified in the safety advisories.
In response to the NEB’s MO, some companies who had purchased fittings from identified manufacturers responded that they relied on MTRs and hydrostatic test results to conclude fitness for service of those fittings. The NEB communicated to those companies that further investigation, testing or reinforcement of fittings is required to confirm fitness for service. This included but was not limited to:
- construction records (e.g., post pressure fit up issues, coating issues);
- visual inspection (e.g., cracked coating due to expansion);
- dimensional checks measurements (e.g., wall thickness, out of roundness/ bulging);
- hardness tests;
- stress analysis;
- burst testing;
- bend testing; and
- applying reinforcing wrap.
One company used a causal factors model (Figure 9) to determine the sample fittings’ yield strength for its stress analysis. In its system, the company had over-tempered fittings as well as fittings with highly variable material propertiesFootnote 7.
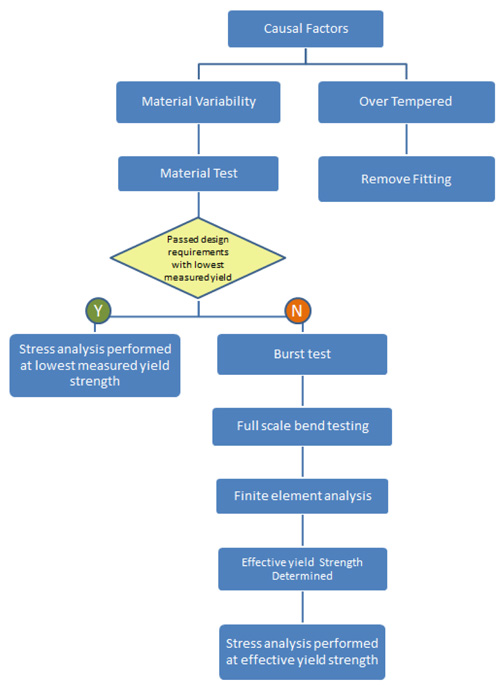
Figure 9 – Causal factors model used by one company to determine
yield strength for stress analysis on sample fittings (NEB, 2017)
Figure Description
This image shows the causal factors methodology that was used by an NEB-regulated company in its engineering assessment. The company had two issues: over tempering and material variability in some fittings. The company replaced the over tempered fittings. For fittings with material variability, the company conducted further examinations including using lowest measured yield strength of the samples that had passed the CSA hoop stress calculation, for stress analysis. For fittings that did not pass the hoop stress calculation, full-scale burst testing was performed on representative samples. Full-scale bend testing was performed next to confirm that the affected fittings could withstand the combined loading of internal pressure with bending loads. A Finite Element Analysis (FEA) was then performed to evaluate the effect of the material variability on the overall capacity of the fittings. FEA study was used to establish the effective yield strength of the fittings. The effective yield strength value was utilized as an input into the detailed stress analysis to evaluate whether the fittings satisfied flexibility and stress analysis requirements of CSAZ662-15, Clause 4.
Further to the above, acceptability criteria were developed by the NEB to evaluate the immediate and long term fitness for service of installed fittings based on a range of technical analyses filed by the affected companies in response to the NEB’s MO. The acceptability criteria are incorporated into Appendix A.
In 2018, the NEB issued MO-003-2018, requiring companies to notify the NEB of any pipe or components received, installed, or in service, that do not meet the mechanical property requirements of industry standards or company specifications. The NEB will use the same acceptability criteria in Appendix A to evaluate submissions pursuant to that MO.
Technical Paper – the Technical Paper identified a number of gaps in the existing standards. It also recommended ten strategies to be adopted by different stakeholders in the supply chain to provide more assurance that pipeline fittings are produced and installed with the required material properties. The strategies target:
- Quality Management Systems (QMS)
- Manufacturing Procedure Qualification
- Inspection and Testing Enhancements
- Procurement
- Acceptance and Testing
- Raw Materials Verification
- Development of MPS
- Development of ITP
- Manufacturing Traceability
- Materials Inspection
Technical Workshop – experts from pipeline companies, distributors, manufacturers, regulators, academia, consulting companies and standards associations attended the workshop hosted by the NEB in June 2017. The workshop included presentations from a number of participants and a break out session. The objective of the breakout session was to discuss the strategies that were outlined in the Technical Paper and suggest possible actions that could be taken by various stakeholders to address this issue. Appendix B provides a summary of the suggestions that were gathered at this session. The suggestions fell mainly in five categories that are summarized in Table 7. Some of the suggestions were applicable to several strategies. These suggestions target the gaps that were outlined under the three main categories in the previous section.
| Suggestion Category | Gap category | |||
|---|---|---|---|---|
| Standards | OPR | QAPs | ||
| NEB-regulated Company | Manufacturer | |||
| Training and competency | x | x | ||
| AML | x | x | ||
| Traceability | x | x | x | x |
| CSA express documentFootnote 8 | x | |||
| Third party certification | x | x | x | |
Revising CSA Z245.11 – the 2017 revision of the CSA Z245.11 Steel Fittings was released in September 2017. The standard was harmonized with MSS SP75-14. It includes a number of improvements that address some of the identified gaps. In some respects CSA Z245.11-17 is now more comprehensive than MSS SP75-14.
4.2 Existing Guidance
Management Systems – The NEB is of the view that Management Systems (MS) are the preferred method for organizations to manage their operational activities in order to achieve the required safety and environmental objectives. As stated in sections 6.1 thru 6.6 of the OPR, NEB regulated companies are required to establish, implement, and maintain, adequate and effective management systems that provides for continual improvement. Each company’s MS must apply to all its activities involving the design, construction, operation and abandonment of a pipeline. Figure 10 illustrates the regulatory requirements for an MS in accordance with the OPR.
QMS – A QMS can work within an organization’s broader MS to ensure products and services consistently meet requirements, and that quality is consistently improved. QMS often have provisions for QAP. For Canada’s federally regulated pipelines, a QAP for pipe and components to be used in the pipeline is required in section 15 of the OPR.
There are a number of standards available that provide guidance on QMS. Examples include:
- ISO 9001 – sets out the criteria for a QMS and is the only standard in the ISOFootnote 9 family for which a certification process exists;
- ISO/ TS 29001 – defines the QMS for product and service supply organizations for the petroleum, petrochemical and natural gas industries; and
- API Spec Q1 – sets out specification for QMS requirements for manufacturing organizations for the petroleum and natural gas industry
These standards have clauses on traceability, training and competency of personnel as well as requirements for maintaining an approved manufacturer’s list. However, while many manufacturers may have ISO 9001 certificationFootnote 10, this is not a requirement for NEB-regulated companies.
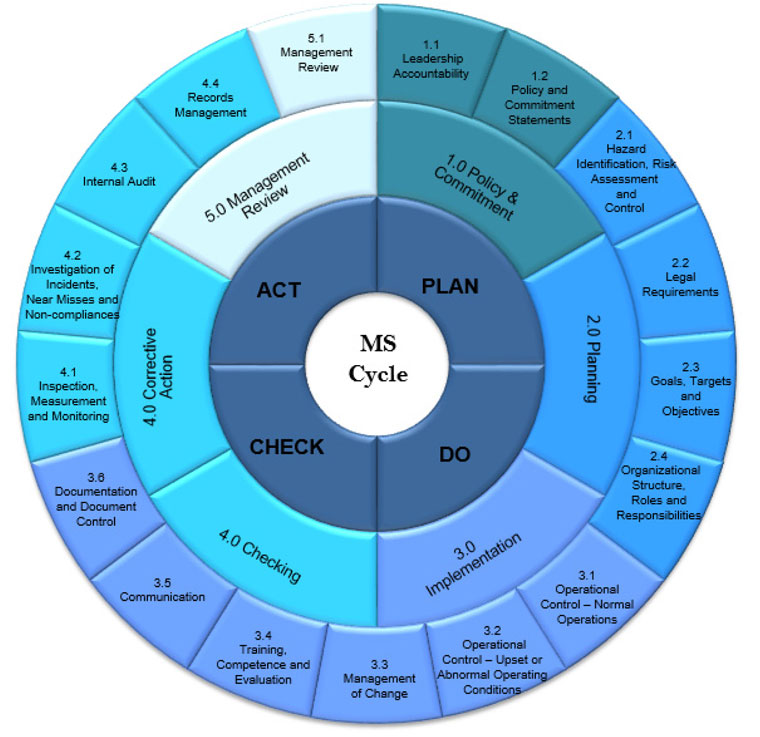
Figure 10 – OPR requirements for a management system elements
and sub-elements as outlined in NEB’s Audit Protocol (NEB, 2016)
Figure Description
This image shows the audit elements and sub-elements for NEB Management System and Protection program. They include: 1. Policy and Commitment: 1.1 Leadership Accountability, 1.2 Policy and Commitment Statements; 2. Planning: 2.1 Hazard Identification, Risk Assessment and Control, 2.2 Legal Requirements, 2.3 Goals, Objectives and Targets, 2.4 Organizational Structure, Roles and Responsibilities; 3. Implementation: 3.1 Operations Control-Normal Operations, 3.2 Operational Control-Upset or Abnormal Conditions, 3.3 Management of Change, 3.4 Training, Competence and Evaluation, 3.5 Communication, 3.6 Documentation and Document Control; 4. Checking and Corrective Action: 4.1 Inspection, Measurement and Monitoring, 4.2 Investigating and Reporting Incidents and Near-misses, 4.3 Internal Audits, 4.4 Records Management; 5. Management Review
4.3 Next Steps
While efforts to address some of the identified gaps have already been pursued, and some of the aforementioned guidance exists, there remains further work to be done. Joint efforts among stakeholders could address these gaps and improve the quality assurance of Q&T pipeline fittings.
The NEB engaged a Multi-stakeholder Advisory Group (MAG) to comment on this white paper. MAG members comprised subject matter experts from NEB-regulated companies, CEPA, manufacturing companies, distributing companies, regulators, CSA, consultants and academia.
There are a number of actions that were suggested in the 2017 NEB workshop (Appendix B) for follow up by relevant stakeholders. All stakeholders are encouraged to follow up on the recommendations of Appendix B. The section below puts forward specific recommendations for different stakeholders to address the identified gaps.
NEB-regulated Companies – The role of technical quality audits and inspection and surveillance activities at manufacturers’ facilities on the part of pipeline companies is crucial to ensuring the quality of materials in pipeline systems. Conducting audits and inspections and monitoring on a regular or ongoing basis allows pipeline companies to qualify the manufacturers they have on their AML.
Deviations from the AML, including when buying from a distributor that does not carry products from a pipeline company’s AML, should be recorded, and go through an exemption approval process. The pipeline company should require its suppliers to have full traceability for Q&T fittings.
CEPA – As the representative of some of Canada’s transmission pipeline companies, CEPA is well positioned to take on initiatives to help its member companies address the potential issue of quality assurance of pipeline fittings in their systems.
In its 2017 quality summit, CEPA put forward a project to develop an ITP standard. The project was initiated in 2018. CEPA could consider addressing the ITP related gaps for Q&T fittings that were identified in the Technical Paper and NEB technical workshop, in this standard.
CEPA is also looking at a broad lessons-learned database for all quality and safety issues. It may be beneficial if CEPA included the following topics for QA of Q&T fittings in the scope of this project:
- Best practices; and
- Key Performance Indicators
Manufacturing Companies – should follow up on workshop suggestions as outlined in Appendix B.
Distributing Companies – should follow up on workshop suggestions as outlined in Appendix B.
NEB – The NEB could lead the development of a guideline for key aspects and objectives of manufacturers’ and purchasers’ QAPs. The NEB should also consider whether and where, within its existing regulatory framework (including relevant, referenced CSA standards), it can add further specificity to its requirements. Guidelines or requirements could more explicitly address:
- interpretation of existing MS and section14 and 15 requirements of the OPR;
- guidelines for auditing manufacturers;
- traceability and recall processes;
- additional requirements for MTR;
- mandatory qualification of manufacturing processes by a competent party, on a regular basis and upon any change in material supplier or chemistry of raw materialFootnote 11;
- raw material certificate;
- real-time monitoring of key manufacturing processes;
- competency requirements for Q&T fittings inspectors;
- first article inspection;
- validation of coupon test results on a regular basis;
- specification of required process controls for heat treatment;
- specification of additional requirements for product ordering;
- definition of lot;
- visual inspection;
- specifications of the key locations on Q&T fittings;
- verification of wall thickness at specified key locations;
- removal of the references to the less stringent standards; and
- comparison of CSA Z245.11 to other standards including European standards to enhance the applicable clauses of the former.
In order to support such analysis, the NEB may benefit from further engagement with regulators outside of North America on the matter, as well as pursuing some additional CVAs to bolster its performance dataset on QA of fittings.
The NEB could also liaise with industry, research and other government organizations to see whether they can allocate a research and development budget to work on the following projects:
- development of new nondestructive technologies to validate mechanical properties of fittings;
- qualification of existing nondestructive examination methods to supplement destructive testing;
- investigation of the use of analytical design to supplement destructive testing;
- production of a technical report on limitations of HSLA steel and typical forming and heat treating processes; and
- investigation into what other sectors (e.g., aviation, auto and nuclear industries) do to ensure QA of pressure-retaining components.
Standards Bodies – CSA could consider taking the actions listed below to follow up on some of the suggestions from the workshop. Creation of a cross-committee task force between CSA Z662 and CSA Z245 may be beneficial.
- specifying the limit ranges for chemistry and carbon equivalent;
- enhancement of minimum requirement for MTRs to include:
- issuance only by the manufacturer that performs heat treatment and mechanical testing of the Q&T fittings;
- no alteration by any other party in the supply chain;
- range of verified dimensions at key locations;
- traceability;
- reference to ITP;
- raw material supplier; and
- welding specification;
- including requirements for FAI in CSA Z245.11; and
- reviewing CSA Z245.11 and making the applicable optional requirements for fittings mandatory
5. Conclusions
In order to make progress on closing the remaining gaps for quality assurance of pipeline fittings, the NEB encourages the applicable stakeholders to take proactive and timely actions on following up with the recommendations of this white paper.
The NEB will monitor recipients’ contributions to effective quality assurance practices for Q&T pipeline fittings in accordance with these recommendations. The NEB intends to follow up with recipients in the event the recipients do not fully implement the recommendations highlighted in the white paper.
The NEB will also continue working with CSA to influence enhancement of the requirements of applicable standards. This work will align with the NEB’s continual improvement approach and ensure that the NEB’s regulatory framework is robust and current and that regulatory requirements and expectations are transparent.
Acronyms
| AML | Approved Manufacturers List |
| API | American Petroleum Institute |
| ASTM | ASTM International |
| CEPA | Canadian Energy Pipeline Association |
| CSA | Canadian Standards Association |
| CVA | Compliance Verification Activities |
| EA | Engineering Assessment |
| FAI | First Article Inspection |
| GIS | Geographic Information System |
| HSLA | High-Strength Low-Alloy (Steel) |
| HV | Vickers Hardness |
| INGAA | Interstate Natural Gas Association of America |
| ISO | International Organization for Standardization |
| ITP | Inspection and Test Plan |
| KPI | Key Performance Indicators |
| MAG | Multi-stakeholder Advisory Group |
| MO | Miscellaneous Order |
| MPS | Manufacturing Procedure Specification |
| MS | Management System |
| MSS | Manufacturers Standardization Society |
| MTR | Material Test Report |
| NDE | Non-Destructive Examination |
| NEB | National Energy Board (Canada) |
| OPR | National Energy Board Onshore Pipeline Regulations |
| PHMSA | Pipeline and Hazardous Materials Safety Administration |
| Q&T | Quenching and Tempering |
| QA | Quality Assurance |
| QAP | Quality Assurance Program |
| QMS | Quality Management System |
| SMYS | Specified Minimum Yield Strength |
| TSB | Transportation Safety Board |
Glossary
Austenitization – heating steel to a specific temperature range, during which the austenite structure is formed.
Competent – qualified, trained, and experienced to perform the required duties (CSA Group, 2015).
Component – pressure-retaining element of the pipeline, other than pipe (CSA Group, 2015).
First Article Inspection (FAI) – complete, independent, and documented physical and functional inspection process to verify that prescribed production methods have produced an acceptable item as specified by engineering drawings, planning, purchase order, engineering specifications, and/or other applicable design documents. The manufacturer performs FAI on new product representative of the first production run. First production run is a planned process designed to be used for future production of the new product (SAE Aerospace, 2004). For pipeline fittings, FAI includes as a minimum, dimensional verification and destructive testing of a representative sacrificial fitting(s) from first production and upon any change in the production process or the raw material.
Fittings – manufactured components such as elbows, reducers, and tees that serve many purposes in a pipeline system, including: connecting sections of the pipe together, controlling the direction of product flow, changing the direction of product flow and changing the product flow rate (NEB, 2017).
Forming – fittings undergo a forming or shaping process involving hammering, pressing, piercing, extruding, rolling, bending, welding, machining, or a combination of two or more of these operations (DNV – GL, 2017).
Hardness – ability of a material to resist permanent deformation, measured usually by indentation (ASME, 2016).
Hardness, Vickers (Hv 10) – value achieved by use of a diamond pyramid indentor with a load of 10 kg (ASME, 2016).
Heat Treatment – heating and cooling a solid metal or alloy in such a way as to obtain desired properties (ASME, 2016).
High-Strength Low-Alloy Steel (HSLA) – HSLA steels, or micro-alloyed steels, are designed to provide better mechanical properties and/or greater resistance to atmospheric corrosion than conventional carbon steels. They are not considered to be alloy steels in the normal sense because they are designed to meet specific mechanical properties rather than a chemical composition (HSLA steels have yield strengths greater than 275 MPa) (ASM International, 2001).
Hydrostatic Test – pressure test using water as the test medium (ASME, 2016).
Material Test Report (MTR) – document that presents all applicable or quantitative results from the applicable CSA Z245 series standard or other standard allowed by CSA Z662, obtained by applying one or more given test methods in accordance with the applicable type of inspection document from European Standard 10204:2004 (CSA Group, 2017).
Non-Destructive Examination (NDE) – is the examination of fittings to reveal imperfections, using methods such as radiographic, ultrasonic, or other methods that do not involve disturbance, stressing, or breaking of the materials. Note: Direct visual inspection is not considered a form of NDE (DNV – GL, 2017).
Pressure Test – means by which the integrity of a piece of equipment (e.g., pipe, fitting) is assessed, in which the item is filled with a fluid, sealed, and subjected to pressure. It is used to validate integrity and detect construction defects and defective materials (ASME, 2016).
Quality Assurance (QA) – quality activities that are focused on providing confidence that quality requirements will be fulfilled. QA applies to the processes used to create the deliverables (DNV – GL, 2017). It is process oriented and focuses on defect prevention.
Raw Material – material such as pipe, plate or billets that the components are wrought or forged from (DNV – GL, 2017).
Specified Minimum Yield Strength (SMYS) – minimum yield strength prescribed by the specification or standard to which a material is manufactured (CSA Group, 2015).
Yield Strength – stress at which a material exhibits the specified limiting offset or specified total elongation under load in a tensile test, as prescribed by the specification or standard to which the material is manufactured (CSA Group, 2015).
References
ASM International. (2001). High-Strength Low-Alloy Steels.
ASME. (2016). The American Association of Mechanical Engineers. ASME B31.8-2016 – Gas Transmission and Distribution Piping Systems. ASME.
ASTM. (2016). Designation: A960/A960M − 16a Standard Specification for Common Requirements for Wrought Steel Piping Fittings.
CanmetMATERIALS. (2017). Quality Assurance of Pipeline Fittings. NEB.
CSA. (2018). CSA Z245.1-18. Steel Pipe-Tenth Edition. CSA.
CSA Group. (2015). CSA-Z662-15. Oil and gas pipeline systems. Canadian Standards Association.
CSA Group. (2017). Z245.11-17. Steel fittings. Canadian Standards Association.
DNV – GL. (2017). Quality Assurance of Pipeline Fittings.
INGAA. (2009, September). Identification of Pipe with Low and Variable Mechanical Properties in High Strength, Low Alloy Steels.
Leering, M., & Rahimi, M. (2016). Standards-based Solutions in Support of Technology Commercialization. Retrieved from BIOCLEANTECH Forum 2016.
NEB. (2016). Management System and Protection Program Audit Protocol. Retrieved from National Energy Board.
NEB. (2017, 3 22). A82190 NOVA Gas Transmission Ltd. – Meikle River D Compressor Station_Leave to Open [Filing A82190]. Retrieved from NEB REGDOCS.
NEB. (2017). Amended Safety Advisory and Draft Order on Pipeline Materials – FAQ. Retrieved from National Energy Board.
NEB. (2018, 04). Quality Assurance of Pipeline Fittings. Acceptability Criteria for Submissions Related to Orders MO-001-2016 and MO-003-2018. National Energy Board.
PHMSA. (2009, May). Advisory Bulletin ADB-09-01. Retrieved from DEPARTMENT OF TRANSPORTATION – Pipeline and Hazardous Materials Safety Administration.
SAE Aerospace. (2004, January). Aerospace Standard. AS9102. SAE Aerospace an SAE International Group.
TSB. (2013, October). Pipeline Investigation Report P13H0107. Retrieved from Transportation Safety Board of Canada.
Appendix A – Acceptability Criteria Flowchart for Submissions Related to Orders MO-001-2016 and MO-003-2018 (NEB, 2018)
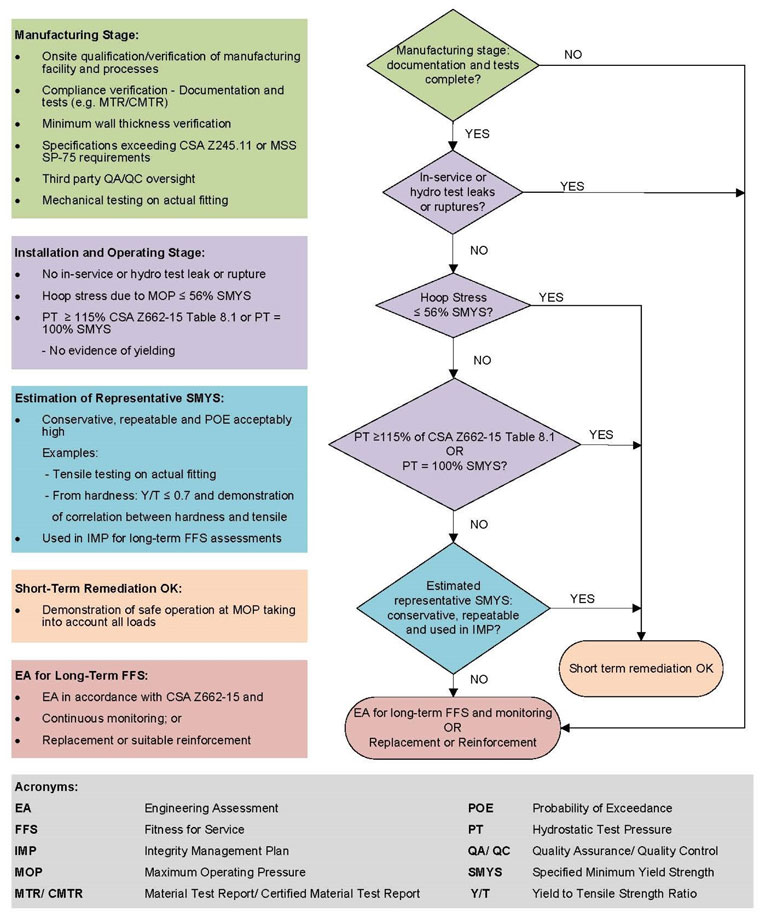
Figure Description
The flowchart provides a visual summary of the content of a document entitled Acceptability Criteria for Submissions Related to Orders MO-001-2016 and MO-003-2018.
Appendix B – Summary of Suggestions from QA of Pipeline Fittings Workshop
| Stakeholder | NEB-regulated company | Manufacturing Company | Distributing Company | NEB | Standards Body |
|---|---|---|---|---|---|
| Strategy | |||||
| Strategy 1 – QMS | – Training and competency of inspectors – Maintaining an AML – Requiring distributors to follow AML |
– Training and competency of personnel – Pre-approved criteria for selecting sub-vendors – Recall process |
– Following pipeline company's AML | – Wider engagement with other regulators and accrediting bodies – More engagement with smaller companies about regulatory framework regarding QA of Q&T fittings – Working with standards bodies and industry to update/raise the level of minimum standards – Considering if and where, within its regulatory framework it can add further precision |
– Engaging with regulators and industry – Working with regulators and industry to provide clarity on requirements and to update/raise the level of minimum standards – Requirements for a manufacturing recall process |
| Strategy 2 – Development of MPS Strategy 3 – Development of ITP |
– Improvement of detailed post-purchase ITP – Leveraging cross sector best practices – Review and assess MPS and internal ITP during qualification process |
– Improvement of plant-specific MPS in accordance with clause 6.6 of CSA Z245.11-17 and submitting to purchaser when requested – Improvement of detailed product-specific ITP in accordance with clause 6.7 of CSA Z245.11-17 for each manufacturing facility |
– Engagement with CEPA and the Interstate Natural Gas Association of America (INGAA) – Facilitate technical discussions and workshops that can lead to improved MPS and ITP – Development of an Express Document to feed into the standard |
– Implement more rigorous requirements and controls as part of the standard (e.g. as an informative annex) | |
| Strategy 4 – Manufacturing Traceability | – Records maintenance for traceability in an accessible format after the piping or component is installed – Translation of records into usable data/information that is accessible – Leveraging traceability data to make better operational decisions – Tying unique identifiers to geospatial locations (GIS) |
– Unique identification number for applicable manufacturing component, raw material and/or consumable – Producing standard MTRs – Records maintenance for traceability in an accessible format after the piping or component is installed |
– Considering if and where, within its regulatory framework it can add guidance/ requirements regarding demonstration of a well-managed asset data traceability system for pipeline companies – Considering if and where, within its regulatory framework it can add guidance/requirements for traceability of components in final installed pipeline systems |
– Clearly defined requirements for traceability, both around what needs to be maintained and how it should be maintained/ accessed – Requirements for providing minimum information behind a unique identification number – Mandatory and standardized MTR |
|
| Strategy 5 – Material Inspection Strategy 6 – Raw Materials Verification |
– Nondestructive determination of chemical composition – Hardness measuring devices |
– Traceability of the fittings – Real time monitoring of key Q&T manufacturing processes |
– Requirement for a mandatory third party certification of production process | ||
| Strategy 7 – Manufacturing Procedure Qualification | – Development of qualified NDE methods to supplement destructive testing of fittings | – Using analytical design (to a recognized piping code) in lieu of or supplementary to proof testing – Development of qualified NDE e testing of fittings |
– Development of an Express Document to feed into the standard or an annex to the appropriate standardmethods to supplement destructiv | – Specification of mandatory training for manufacturing personnel – Standardization of the standard deviations of the control parameters for historic and modern manufacturing and heat-treatment procedures for the wider range of materials |
|
| Strategy 8 – Inspection and Testing Enhancements | – Better communications between pipeline company, manufacturer, and the third party inspectors on the scope and expectations of inspections – Dedicated “fittings” training for inspectors – First article testing to validate coupon test result |
– Enhancement of manufacturing processes and practices – Standardized first article testing |
– Enhanced qualification tests | – Work with standards body to enhance requirements | – Improvement of lot definition in CSA Z245.11 – Enhancement of the applicable standard(s) |
| Strategy 9 – Procurement | – Maintaining an AML – Requiring the distributors to follow AML |
– Maintaining an approved list of suppliers | – Following NEB-regulated company’s AML | – Development of a standard third party certification program | |
| Strategy 10 – Acceptance and Testing | – Pre- and post-purchase testing – MTR review – Visual inspection – Spot checking wall thickness and suspect areas |
– Only body to issue MTR | – Requirements for inspectors’ competency – Alignment between standards – Standardization of MTR – Mandatory third party inspection – Joint CSA MSS annex on inspection |
- Date modified:
